
Frequently Asked Questions
"Is there a manual?"
A quick start guide for getting started with patching blocks can be found here, and an excellent manual covering Blocks in Reaktor is here.
There isn't a manual for the individual toybox blocks but some information on the functionality and controls of each block can be found on the toybox website by clicking on the "READ MORE" button for each pack. Also "Info Hints" are available by enabling the "Info Hints" button ("i" icon on the main Reaktor tool bar) and then hovering the mouse over any control or port or over the title bar of any block.
There's also a short video to get you going here and and a short tutorial on building a simple synth here.
More In-depth manuals for using Reaktor and building your own Reaktor Blocks can be found on the Native Instruments website here.
Having a good grasp of audio engineering concepts like "frequency", "signals", "waveforms", "positive and negative values" will help when getting into the nitty gritty of making patches. There are good tutorials online like this one that cover these basic concepts. There is also a good primer in modular patching here.
Also check the toybox YouTube channel for the latest tutorials and demonstrations.
"What are the System Requirements for installation?"
MacOS 10.12 (Sierra) onwards, Intel Core 2 Duo or higher
Windows 7, 8, 9 and 10, Intel Core 2 Duo/AMD Athlon 64 X2 or higher
Installation of Native Instruments Reaktor Player 6.4
No need for full Reaktor licence
"The GUI isn't updating when I turn the controls, why?"
To save CPU most of the blocks will automatically switch off processing if they are not connected to anything (like an output or another active block). On some of the blocks parts of the GUI display will not update unless the block is connected to something.
"What is the difference between the pitch ports, gate ports, modulation ports and the audio in and out ports?"
All ports in Reaktor Blocks are just audio rate signals between -1 and 1, so you can basically feed anything into anything.
Audio signals are generally signals between -1 and 1 that represent the sound traveling through the cable. The signal is called an audio signal because it's changing very rapidly, at a frequency in the audible range (between 20Hz and 20kHz).
Pitch signals are control signals between 0 and 1 where an interval of 0.1 equals 1 octave, so you have a range of 10 octaves between 0 and 1. Pitch signals are used to control the pitch of an oscillator or the frequency of a filter by connecting the cable to the 'PITCH' input port.
Gate signals are generally just a pulse between 0 and 1 where a positive value opens the gate or causes a function to reset or restart and a value of 0 or a negative value will close the gate. Any signal can be connected to a ‘Gate’ or ‘Reset’ port: positive parts of the signal will open the gate or trigger a ‘Reset’ and negative parts of the signal will close the gate. The envelope blocks have a switch labeled 'VELOCITY', if this switch is enabled the output level of the envelope will be controlled by the positive value of the incoming gate signal, for example if the gate's positive value is 0.5 the envelope will be quieter than if the the gate's positive value is 1.
Modulation (for example connected to the A B modulation bus ports, see below) can be any type of signal: audio, gate signals, pitch etc.
You could for example record gate signals from the output of the gate sequencer into the sampler and use the sampler to play back the sequencer with the sampler's ‘COURSE' pitch control controlling the sequence speed.
Or you could use the ‘Oscillator’ to trigger the ‘Gate Sequencer’ to play periodically by connecting the output the oscillator to the ‘PLAY’ input port of the gate sequencer (set the frequency of the oscillator to very low value) thus the sequence would play every time the value of the oscillator waveform is positive.
Position signals are just signals that ramps up from 0 to 1 slowly in a looping fashion and are used to drive sequencers. The position signal simply represents the playback position of the sequence within the bar (the Nano Pack 'Ramps' block can be used to generate a suitable position signal, although really any audio signal can be used, for example the output of an oscillator or an LFO).
"What are the ports labeled A & B for?"
The A B input ports on each block are the modulation inputs for the block. There are 2 modulation buses* (A & B) for each block that can modulate (control from another signal) most of the knobs and controls on the panel of that block.
For example, if you want to modulate the cutoff frequency of a filter block with an oscillator, you attach the output of the oscillator to modulation input "A" on the filter (then the little round LED next to the "A" on the filter will start to blink, showing that there's a signal arriving at the 'A' modulation bus), click on the 'A' button next to the LED and it will display a set of sliders next to all the controls, these sliders set the depth of modulation, for modulation bus 'A', for each control. Drag the slider next to the filter’s cutoff frequency knob to start modulating the cutoff frequency.
This does mean that as you only have 2 busses for modulation for each block, i.e you can only connect 2 sources of modulation to each block (although you can mix modulation sources together, e.g using a mixer, before sending them in). All the controls are automatable so you can use your DAW’s automation to modulate knobs once you run out of modulation busses.
The 'Wavetable' block has 2 extra modulation inputs, these are 'XY Mod A' and 'XY Mod B' (you can only see 'XY Mod B' in the 'structure' view, the 'structure' view is displayed when you click on the '=' icon). This gives the X Pos and Y Pos controls their own dedicated modulation bus inputs. If nothing is connected to these ports then the normal A B modulation buses are used for these knobs. These extra modulation ports just adds some extra flexibility for controlling the wavetable position if needed.
Some blocks have dedicated modulation inputs too for specific controls or functions, for example the Sample Player block has a 'Select' input port that selects the sample to playback from all the loaded samples (you can drop as many samples on to the block as you want and then choose which one to play). This port overrides the 'Select' knob if a cable is connected to it. You could alternatively use the A or B modulation inputs to modulate the 'Select' knob, which would do the same thing, but the dedicated 'Select' port is a shortcut and leaves the A B modulation buses free for modulating other controls e.g for modulating the 'Pitch' or 'FM' controls.
* 'bus' or ‘buss’ is an audio engineering term that just means a single place inside a piece of equipment that multiple things can be connected to or multiple signals can be mixed down to. For example the ‘effects bus’ of a mixing console feeds signals from all of the channels of the mixer being sent to that bus, to a single effects unit.
"The racks are using a lot of CPU power, what can I do about this"
The high quality filters and oscillators used in the packs come at the cost of a high CPU load. To keep the CPU load to a minimum it is recommended to use the 'Mini Filter' and 'Mini Oscillator' found in the 'Free Pack' when a complex oscillator or filter is not needed. The 'Mini Filter' and 'Mini Oscillator' are designed to be much 'lighter' on the CPU while still having great sound quality for most settings.
Also due to CPU 'bottle-necks', related to how quickly program data can be fetched from main memory or 'on-chip' memory 'caches', larger racks will run less efficiently on your CPU than more compact racks. As the rack becomes larger the CPU will run less efficiently and the CPU load will start to increase exponentially as the Rack grows beyond a certain point. The solution is to keep racks smaller if possible or to use multiple instances of Reaktor running smaller racks rather than a single instance running one giant rack. Despite following these suggestion you will still find sometimes that Racks take up a considerable amount power from your CPU, so bouncing or 'Freezing' tracks in your DAW may be needed.
"When I drag notes on the Piano Roll block after turning the 'effects knobs' the notes appear to jump around to random positions"
This is normal behaviour: The 'effects knobs' transform the position of the notes 'non-destructively' in real-time. Moving and editing notes using the mouse with these transformations applied can have unexpected results, with notes moving in random ways and appearing to jump around. If you have only turned controls that have a 'linear' effect like TIME & PITCH then this wont happen, but If you have turned the EXPAND, WARP or JITTER knobs then then notes will jump to unexpected positions, as the transformation is reapplied in real-time to the note's new position.
Clicking the 'PRINT EFFECTS' button (blue button with a stamp icon on it) will apply the effects permanently and you will be able to edit the notes without them 'jumping around'.
"How can I move the pack folders after I have installed them with Native Access?"
If you move the Pack folders to a new location you will need to run Native Access and click on 'Repair' next to the pack to locate the folders in their new location before you can use them again in Reaktor.
"How do I control the Mod Pad block using an iPad?"
You can use the Mod Pad TouchOSC template to control the Mod Pad from an iPad using the TouchOSC app. The TouchOSC app uses OSC messages which are control messages, similar to MIDI messages, that can be sent over an internet connection.
The Mod Pad TouchOSC template can be found in the 'Documentation' folder in the installation folder of the designers pack. The latest version of the template can be downloaded here.
To set up the TouchOSC template:
In Reaktor select the menu item 'OSC Settings..' and use these settings:


In TouchOSC use these settings:
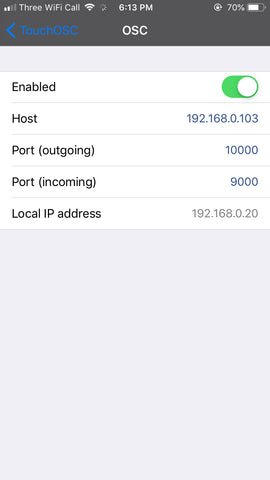

'Target' and 'Host' IP address settings in Reaktor and TouchOSC should match the corresponding 'local IP addresses' on the iPad and computer.